Wednesday, April 30, 2008

Look...

This is a simple card I made with scraps of black and white paper (and a white card base that I'd messed up on), and one of smARTworks' new collage images. This one is called Looking, and I just love the sentiment...

The card measures 4 1/4" square, and is pretty straightforward. The only embellishment is a white "bride" flower (available at Michael's), with a tiny black button brad as the center (Making Memories). Just stamp, trim, and layer onto the card - doesn't get any easier than that...

Take some time to look for good things today!

Monday, April 28, 2008

Count Your Blessings

As I was emptying the camera's memory card this morning, I realized I'd never shared this card. It's another sweet, praying girl from Daily Bread, but this time I paired it up with a sentiment from Blessings. I added just a little color to the image with prismacolor markers; I have just a few of those, but hope to add a couple more to my collection when I find a good sale :) I used papers from the BasicGrey Stella Ruby collection - love the vintage feel of these, and I thought they coordinated nicely with the image.

And can I just point out that I tilted the square? And no, it's not a sketch (LOL!) I know I've been doing a lot of sketches lately, but it's definitely helping me feel more comfortable with mixing shapes and patterns.

Thursday, April 24, 2008

Happy Birthday!

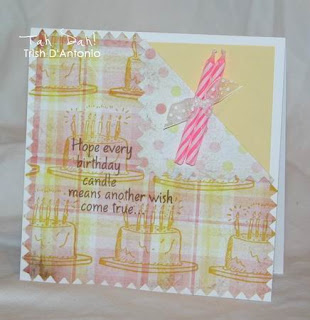
Just a quick birthday card to share today. I'd seen birthday candles used as card embellishments, and always thought it was really cute, so I gave it a go. I kept the card really simple; it's 5 1/2" square, and I layered on this adorable double sided Daisy D's paper (and yes, the edges are already pinked). I did stamp the birthday cake (smARTworks Cake Time) over the plaid, then flipped the corner over and added just a bit of pale yellow. I stamped the sentiment, then added the candles. A little hint: I had a hard time finding an adhesive that worked with the candles themselves, so I tied them really tight, and then used red liner tape to adhere the bundle to the card using the ribbon.

Also wanted to share a very cool idea I ran across yesterday. As I continue to organize my crafting space, I really want horizontal storage for my pens and markers. I've tried the plastic drawers, but they just weren't working for me. Haven't really seen many options, either, which I found surprising. But check out this THIS great idea! You know I'm going to be saving my crystal light containers now :)

Wednesday, April 23, 2008

Tea Party in the Round

Well, Dina is our hostess this time around, and she challenged us to make circle cards. I'd only made 1 circle card in the past, and remembered having a hard time with the layout... and this time was about the same :) I ended up going with this collage - I like that there are some straight lines with the eye image and sentiment. There are a several stamp sets here: Worries (sentiment), Bits of Time #1 and #2 (key, clock), Love Eyes, and Kings (crown - stamped in silver brilliance ink - the photo just happened to capture the reflection) The card base is bazzill bling, and I cut it with a coluzzle (and yes, it fits in a standard notecard envelope). The tulip is because my 3 YO thought I needed a "pretty flower" and plucked it before I could form the word, "No!" so I figured I might as well use it :)

This second card is from my first attempt at a circle card, but the panel just looked too plain and I couldn't decide what to do with it... Mojo sketch to the rescue! It has sort of an Indian vibe to it with that background paper, and the sponging around the flower is brilliance copper ink so there's a bit of metallic shine. I stamped the flower (Daisy Trio #2) with mostly palette inks: 1st (solid) layer with raw sienna; 2nd with L'Amour red and giverny green, with some red versamagic in the center; 3rd with boudoir blush, veridian leaf and sepia versafine in the center. The little palette cubes seem to work well to ink up these images, but even the larger versafine pad worked fine by just "dabbing" ink on with the corner. I overstamped the sentiment (Wonderful/Marvelous) with black versafine, then completed the card with papers from the BasicGrey boxer collection.

Want to see what the other smART cookies have created? Then check out In the Works, Mama Dini's Stamperia, Dee's Studio & Sweet Somethings!

Tuesday, April 22, 2008

In His Presence

The theme for the current Salt challenge is presence, and I immediately started thinking about Psalm 139. No matter where I am or what I'm doing, His hand will guide me and hold me fast. What an amazing promise! I pulled out my concordance to see where else the word "presence" is used, and came across this passage:

Blessed are those who have learned to acclaim you, who walk in the light of your presence, O LORD.
They rejoice in your name all day long; they exult in your righteousness.
For you are their glory and strength...
(Psalm 89:15-17a)

The phrase "learned to acclaim you" really jumped out at me. We are always in His presence, but the true blessing comes when we've learned to delight in that, to praise Him at all times. And it doesn't just happen - we have to make it a habit.
I decided to highlight the first verse on this little door hanger made from a coaster. I started by stamping the path (Stampscapes) onto some BasicGrey paper, then added just a tiny bit of color to it with prismacolor pencils. I printed the verse, then trimmed and adhered it. I added the heart/cross rub-on (from Joann's - they have a nice little section of faith-based products now!), then glued it all on to the coaster. I added some ink to the edges, then ran the ribbon through two eyelets.

Saturday, April 19, 2008

You've Bean a Blessing

I mentioned smARTworks' new "Trios" line earlier this week, and here's my first finished product. The flowers are all beautiful, but I just love this mug set. Dina designed the images to start with the lightest color and darken progressively, but I wanted to see how it would look starting with the darkest image on the bottom. I love how it turned out! My initial mug is stamped with sepia (Versafine, same ink I used for the sentiment), then the second layer is wheat (Versamagic), and the final highlight is white (Technique Tuesday). I can see myself having a lot of fun playing with colors on this image :) Anyway, after I'd stamped my initial image, I noticed the Mojo33 sketch I'd jotted down earlier in the week, and figured that it worked pretty well with my mug. I layered it with papers from the BasicGrey Sugared pad, playing around until I came up with this combo that's feminine but not overly girly. The final touch was the three little embellishments on the side... and yes, those really are coffee beans. A bit corny perhaps, but I love it!

Thursday, April 17, 2008

And We Thank Him...

I wanted to share this really simple card made with the smARTworks Daily Bread set. I love black and white cards, but don't make them all that often... I think it really works here as it just lets the sweet image shine through. I stamped the little girl, then outlined her with a light gray marker. I cut and embossed the panel with rectangle nesabilities, then used the coordinating scalloped die with black. I layered it over a scrap of paper (Oriental Trading), and then stamped the sentiment directly on the card. Isn't it precious?

Tuesday, April 15, 2008

Sharing some love

I needed to make an anniversary card for some friends, and when I saw Mercy's sketch, I knew I'd found my starting point. This went together quickly using some retired SU designer papers, and the Love stamp (Brenda Walton - Inkadinkado). It needed something more, though, so I die cut a heart from some heavy plastic packaging I'd saved, then went around the edges with palette ink. I embellished it with a prima and a bit of ribbon, and then used a brad to hold it all down (thereby taking care of the interminable question of how to attach a clear element). Beauteous!

Monday, April 14, 2008

Haven

These past few months I've been really into the home and house images, quotes, etc. Some of that is probably because of the MOPS theme (Home Factor: Dwell Well), and my devotion to HGTV might play a small role, too. Anyway, this is another card I made using the smARTworks' House Warming and Home sets. I started by stamping the house, coloring it with prismacolor markers, and then trimming down the panel with a portion of the house outside. "Home" is spelled out with Cosmo Cricket chipboard letters, and then I masked off the sentiment to use just the three words. Hint: cover unwanted words with scotch tape, ink normally, then remove tape and stamp. Obviously I made this as a card, but I think it would be really nice as a small framed piece for an entryway or side table (wow, did I just sound like an HGTV groupie or what? :)

Also wanted to let you know that smARTworks is releasing some GORGEOUS new images tomorrow. The online catalog has been updated, and the new goodies start at page 126. (If you want to click through quickly, then click through to page 126, and then just enter 127, 128, etc. on your browser's address bar). I cannot wait to get my hands on those Trios (flowers, and even a coffee mug!)... oh, and a beautiful house set that's just begging to be watercolored.

Hope you're having a great day, and hopefully you have just a bit of time to enjoy your own haven...

Sunday, April 13, 2008

Beautiful RAKS

It hit me earlier this week that I never shared any of the lovely cards I received when my FIL passed away. My hubby likes to tease me about my "imaginary friends," but I truly have been blessed by these ladies.


A heartfelt thank you to: Dina, Heidi, Susan, and Jacki

Saturday, April 12, 2008

More Mojo-ness

Well, here I am doing yet another challenge (perhaps I need to seek help? Nah, it's an excuse to stamp more!! :) This card is based on Julee's Mojo Monday sketch, and I used this darling little girl (Paperbag Studios) as the focal image. (After looking at the sketch again, I think I was supposed to have my focal point in the front square. Oops.) I added just a hint of color with chalks, and then layered some paper and other embellishments. Don't you just love that epoxy sticker? I also added three eyelets before mounting it to the brown base. She's such a cutie...


This was my first attempt. It has all the elements, but they just didn't look right when I lined them up according to the sketch. I took my color cues from a K-ology paper pad - love those purple tones! The heart image is embossed, and the gate (both images Paperbag Studios) was done with the castaway pad. (That was one of those purchases that had been "lost" in the crazy craft heap, but was recently rediscovered). I added a layered flower, and the final touch was the row of faux brads created with Liquid Pearls. I swear they were straight initially, but as I tapped the cardstock to make them settle (and get rid of the unsightly lift-off lump) they shifted a bit. Anyone know of a better way to handle that issue?

Well, I'm off to straighten up and then oversee bath time. Hope everyone is having a great weekend!

Friday, April 11, 2008

More Flower Power

Well, I had more stamped copy paper left from that layered flower, so when I saw the challenge at LilyBean's Paperie, I knew I wanted to play along. We were to create a card using red, green, black and cream - but not for Christmas; make a flower; and include trim. So here goes...

I took the plain white paper stamped with script (smARTworks One Smile), and inked it up to make it "creamier." I hand cut the layers, and then edged each with red ink. I used an ivory button for the center (yes, I even sewed it!) and incorporated a bit of green with the leaves. I used papers from the BasicGrey Figgy Pudding collection, but the red print on the base was stark white, so more ink and a few spritzes of gold glimmer mist. I inked the edges with black, added a sentiment (Hero Arts) to the red panel, then layered on some lace trim that was floating around in my drawer. Quite simple (and not all that different from yesterday's card), but I think the the recipient will still be appreciative. (Finished card measures 4x6)

Wednesday, April 9, 2008

Inspiring Tea Party

Well, this week it was my turn to host the smART Cookie Tea Party. I debated what to do, and finally decided to make it an Inspiration Challenge based on this painting. I really liked the colors as well as the blocked layout, and I thought it would be fun to see how each person interpreted it.

I used both the colors and general layout on this card. I started by blocking off the background and applying ink directly to the white paper. I then overstamped the flowers (Vert Love Comes) and the word (bonus rubber). I also added just a bit of detailing between the red and green panels (Accents #1). I colored the flower with Prismacolor pencils, and then grunged up the card with some brown ink. (Card is 4 1/4" square)

Well, that was all I was planning to do. But then I saw this post about making layered flowers, and I just had to try it for myself.

So last night while watching NCIS (finally a new episode!!) I repeatedly stamped the script (One Smile) onto plain white copy paper. I then cut out some random wavy things that vaguely resemble circles and inked up the edges. Layered them together and added a button (which was plain white cloth covered, so I inked it up). Quite pretty! I layered that over gold ribbon, white cardstock, and a burgundy card base so I was at least in the neighborhood of the painting's colors. I added the sentiment (Bluebird), but it still needed a little something more so I made some simple leaves. I love the flower, and will definitely be making more in the future. It does take just a bit of time, but doesn't require much concentration so it's a good TV watching activity :)

So would you like to see what the other cookies have done? Check out Mama Dini's Stamperia, Dee's Studio, SusieStampALot & Sweet Somethings!

Tuesday, April 8, 2008

Aqua - Brown Extravaganza

As I was making my way through Google Reader this morning, I noticed that Mercy had a sketch up. I really liked it, and thought I'd give it a whirl. Once I had the kids occupied, I darted off and started rifling through paper to see what grabbed me - I ended up using these simple patterns from the BasicGrey Figgy Pudding line. I started with the eyes (Love Eyes) and added a single word ("bonus rubber," which means fun freebies added to your order). Layered it all up, and ended up straying slightly from the sketch by placing the dew drops at the bottom of the layered strip. Finished card is 3x6.

Since I had all the stuff out, I decided to make a second card. This time I stamped the sentiment (Butterflies) with a butterfly (End/Begin) behind it (stamped off once first). I glued some paper pieces onto a Fabriano notecard, misted it all down with Pearl glimmer mist, and then glued the sentiment panel on. It needed just a bit more, so I added a prima flower with a brad in the center. OK, now it's all done. One little note - I did trim the edges of the Fabriano card down just a bit so they're all nice and sleek; I normally love the "soft" edges of the notecards, but it just doesn't look right once you layer paper all the way to the edge.

Hope you're having a great day - I'll be back tomorrow for a little party with the other smART cookies!

Monday, April 7, 2008

Go fish!

Well, the smARTworks design team has just completed another challenge round, this time using the Trout Duo set. Being a good Montana girl, I'm very familiar with these scrumptious fish (best when cooked over an open fire) but can't say I've done much paper crafting with 'em. It's a very nicely drawn set, and I initally set out to make either a vintage or masculine type card. But then a little scrap of paper changed all that...

Yes, a little triangle that had somehow avoided the "trash sweep" ended up laying near my sample image, and for some reason that made me think of a party hat. And well, it was all bright colors and puns from that point on. I really did have a lot of fun with this card, from the pom-pom on the hat all the way to the googlie eye :) The greeting was stamped with Alpha-02, and it's supposed to be a play on the standard birthday wish (get it?). The card is quite small - only 4 1/4" square, but some things are better in small doses.

Check out the other smART Cookies creations here. See, you really can create some lovely things with this set!!

UPDATE: Interested in free rubbah? Get all the details at the In the Works blog!

Sunday, April 6, 2008

A few more cards

I managed to participate in one other VSN challenge last night - this time we were to use the cracked glass technique. Frankly, I've had mixed results with that technique and much prefer using Ranger's Crackle Accents. Since I needed to allow for drying time, I started by stamping and coloring the Butterfly (End/Begin), then coated it and set it aside. I pulled out BasicGrey paper and fiddled with a few ideas before settling on this layout. I just love that sentiment (Soar), and I added the little caterpillar on the bottom as a creeper. Tied a bit of ribbon, and it was all set.


I also made this card yesterday, using this weekend's Sketch for You To Try. I really like the clean and simple lines of it, and know I'll be using it again. I grabbed a stack of 7gypsies paper, and stamped the girl (Paper Artsy by Inkadinkado) over the script. I added more paper, layered it onto a base made from Bazzill, then added some sheer ribbon and a lock padlock. The charm says "secret" on it, and I think it looks like this girl has one :) Final accent was three dew drops; the paper actually had dots on it already, so it made lining them up super simple!

Well, I think I've now shared all my weekend projects... time to take care of some household duties!

Saturday, April 5, 2008

Aaaaahhhhhh! I can't stop stamping!

I've always wanted to participate at Virtual Stamp Night over at SCS, but the timing never worked out. Well, I just realized there was one tonight. Too bad I hadn't paid closer attention earlier this week! I did sneak in one card - I stamped the images (Daily Bread), then took them into the bathroom with me and colored while I supervised our little girl's bathtime. I guess tonight has a fashion theme, and this particular challenge was to follow a "pattern" (a/k/a sketch). Oh, and the harder part? Only 45 minutes allowed! My coluzzle is currently MIA, so I traced a vase to get my circle and then handcut it. Not perfect, but you get the idea. I cut the card base from Bazzill (4 1/2" square) and then layered on some Chatterbox paper and the loaf of bread. Fun times!

Feelin' My Mojo

I'd been wanting to play along with one of Julee's Mojo sketches for awhile, and it finally happened! This week's sketch featured a scalloped circle focal point - a large flower is close enough, right? I recently won some blog candy that included the SU Just 4 You Simply Scrappin' Kit, so this card went together really fast. Love the colors!

And thanks, Laurie, for the wonderful goodies!!

Friday, April 4, 2008

Clearly, this is a cool card :)

I love the look of clear elements on cards, but honestly haven't played around with them much. Well, yesterday's challenge on SCS was to use rub-ons. I had picked up these colorful rub-ons (American Crafts) somewhere last year, but had yet to use them. Part of the reason I'm drawn to rub-ons is that they can be used on so many surfaces - plastic, glass, etc. So howzabout I dip into my pile of saved packaging (I know I'm not the only one that does that, right?) and cut a piece of plastic to do this window card. I cut the front panel out of the DCWV card base (I liked that the inside was white) and then used the super strong tape to adhere the panel to the inside. Add a couple rub-ons, some tiny gems, and it's all done!

Thursday, April 3, 2008

Happy Butterflies

I love techniques, and subscribe to the Technique Junkies newsletter. I hadn't played much lately, but was really impressed with the samples I'd seen using Reinker splash, so last night I pulled out Palette metallic inks (luscious lilac and satin sage). Very cool results - this card uses the 2nd generation pressing (and it's on matte cardstock) - yes, you'll be seeing something made with the original pressing soon :) I stamped the butterfly (End/Begin), then trimmed and matted the panel. I used Combo Sentiments to add the greeting, using the metallic ink on "happy." I tied on some ribbon and popped the sentiment panel up on foam dots just to add some interest.

This shot captures a bit of the shimmer. I just love sparkley stuff (but you may have already guessed that :) and I just wish that I could capture it better in the photos.

BTW, if you're not a TJ subscriber but are interested, you can get a 2008 online subscription for only $9.95. These are step by step photographed instructions, so they're very easy to follow. There's more info on this over at Pat's blog (the creator/publisher of the newsletter). Check it out!

Wednesday, April 2, 2008

Make people wonder...

I made it a point to squeeze in some stamping time today - I really enjoyed "forcing" myself to stamp each day last week. I used the SCS sketch challenge as a starting point, and had a lot of fun coming up with this sassy card :) The papers are from "Phresh & Phunky" Basic Grey collection; they're a couple years old and had been buried in my craft room. I stamped the vintage lady (Thoughts of a Stamping Diva) on the pink panel, and then added the sentiment (smile by studio g, "it makes people wonder" is a partial sentiment by Inkadinkado). I finished the card off by layering dots and stripes, did some minor distressing, and added a little prima flower.

Nothing fancy, but it brought a smile to my face and I'll be passing it along to a friend soon and I'm guessing it will make her grin, too.